使用框架Tauri开发应用之初探
更新日期:
Tauri是一个开发框架, 使用web技术来开发跨平台桌面应用。界面使用Javascipt/HTML/CSS开发,而业务功能使用Rust开发。Rust将编译为可执行文件,负责创建窗与webview,并加载web内容进行显示。
Tauri与Electron比较类似,但是使用了不同的技术: Electron应用中嵌入了Chromium浏览器,使用nodejs与系统交互,生成的应用安装包会比较大;而Tauri依赖于系统的webview, 使用Rust开发原生功能, 生成包会比较小,但需要在操作系统中有预安装的webview库。 Tauri在Windows中使用WebView2,基于Microsoft Edge浏览器(Chromium内核), Windows 7开始支持,Windows 11系统会自带安装; 在macOS与linux中使用WebKit, macos使用WKWebView, linux使用webkit2gtk。
参考:
- Tauri https://tauri.app/
- Tauri webview versions https://tauri.app/v1/references/webview-versions
- Electron https://www.electronjs.org/
预先安装软件
这里仅列出windows下需要安装的软件,其它平台的请参考Tauri的文档。
- C++构建工具: Windows下需要安装Microsoft Visual Studio C++ Build Tools, 可参考 https://visualstudio.microsoft.com/visual-cpp-build-tools/。
- Rust构建工具链: 可参考https://www.rust-lang.org/tools/install 来安装
rustup。windows下也可以在powershell中使用winget命令来安装winget install --id Rustlang.Rustup; macOS平台是安装xcode,使用命令xcode-select --install。 - webview平台相关运行时库: windows平台需要安装
WebView2, 参考微软官网; macOS不需要单独安装; linux平台则要安装包webkit2gtk,各个发行版本的库名还不太一样。
参考:
- https://tauri.app/v1/guides/getting-started/prerequisites
- Microsoft Edge WebView2 https://developer.microsoft.com/en-us/microsoft-edge/webview2/#download-section
初始化项目
最简单的初始化方式是使用create-tauri-app命令,与react开发中的create-react-app工具类似,但是是使用rust中的cargo包管理工具来安装,支持从多种前端框架的模板进行创建。安装cargo包是一个漫长的过程,安装完成之后,可以探索下这个工具支持的框架有哪些。
1 | cargo install create-tauri-app --locked |
前端使用nodejs开发
执行cargo create-tauri-app时先提示输入项目名称,这时输入的是tauri-app1;然后是提示选择前端框架,支持2个选项: (1)Rust, (2)TypeScript/JavaScript。按上下方向键,向下移动选择TypeScript/JavaScript,选中后按入回车键,选择的结果回显在行尾。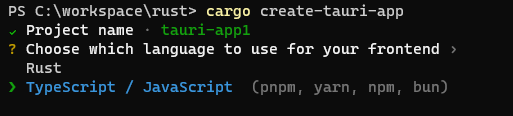
接下来选择包管理工具: pnpm, yarn, npm, bun。这些都是nodejs开发常用,先选择npm。
然后是选择UI模板,也就是选择前端框架,支持的有Vanilla(即原生javascript, 不包含框架),Vue,Svelte,React,Solid,Angular,Preat。我个人使用react相对较多,就选择react了。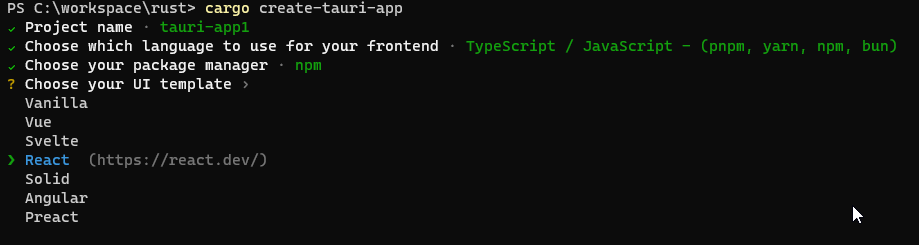
最后一个选项,偏好使用TypeScript还是JavaScript,我选择的是TypeScript。
所有选项完成并按回车后,提示创建成功,并给出下一步需要执行的命令。npm run tauri dev这一条,在package.json里scripts加入一行脚本"tauri": "tauri", tauri命令来自于npm包@tauri-apps/cli,通过npm包来安装的工具。tauri使用npm包来封装了命令行程序、与rust交互的接口。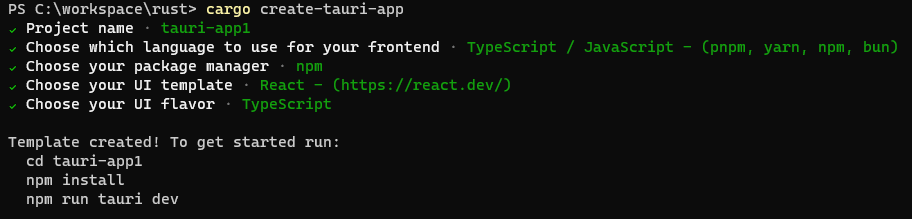
创建完成后,查看文件夹下内容,第一层目录是nodejs项目,已创建package.json文件,src目录下是reactjs相关的文件;目录src-tauri则是和tauri有关的Rust项目,包含Cargo.toml文件,tauri.conf.json是tauri项目的配置文件。本目录下将编译生成可执行文件,即程序启动时的入口。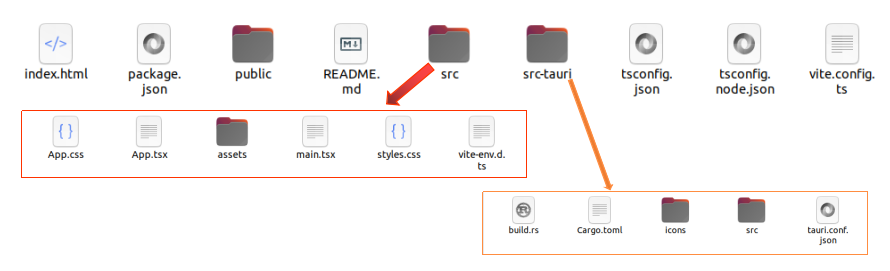
前端使用Rust开发
继续使用cargo create-tauri-app创建一个新项目tauri-app2, 第二步选择Rust后,第三步显示支持的框架有Vanilla,Yew,Leptos,Sycamore。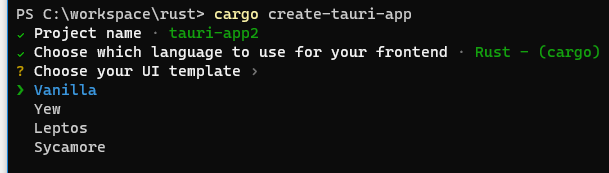
框架选择Yew,项目创建完成,提示可执行的命令为cargo tauri dev,这里的tauri命令需要通过安装包cargo install tauri-cli来进行安装。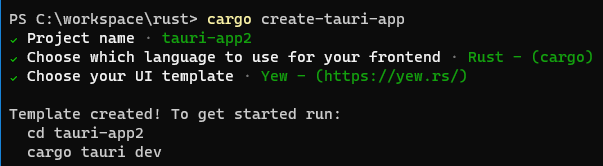
创建完成后文件夹下的内容如下,第一层目录下是rust项目,生成了Cargo.toml文件,同样存在着一个src-tauri目录,里面包含的文件列表与使用React作为前端项目语言时是相同的。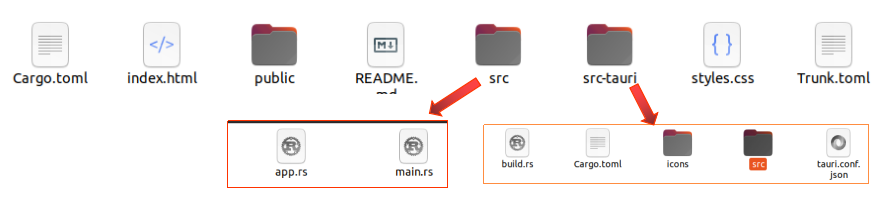
如下是在VS code中浏览项目时,显示的文件名列表,这里可以看出文件名的全貌。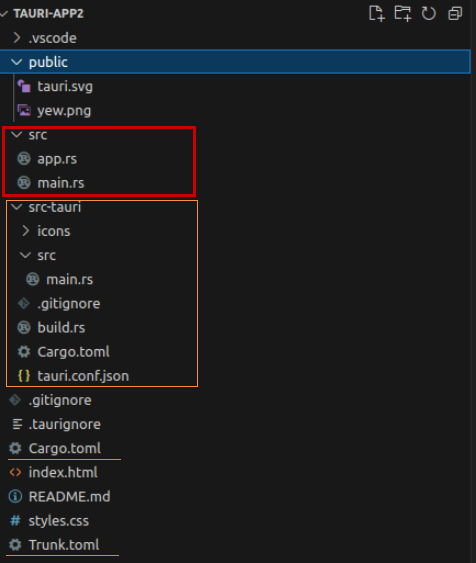
在已有项目中添加tauri框架
tauri也支持在已有前端项目中添加tauri框架。通过命令cargo install tauri-cli安装tauri命令行工具, 再在已有前端目录下执行命令cargo tauri init,然后通过交互式命令来创建src-tauri目录,生成的内容与create-tauri-app工具创建的相同。
参考:
tauri项目的配置文件
通过前面创建的项目,配置文件为src-tauri/tauri.conf.json,是一个JSON格式的文件。配置文件格式也支持json5与toml, 需要通过cargo features config-json5与config-toml开启,文件分别为tauri.conf.json5和Tauri.toml。
前面创建的React前端项目tauri-app1的配置文件tauri.conf.json内容如下。build下为前端项目相关的配置,build.beforeDevCommand为开发阶段前端执行命令, build.beforeBuildCommand为构建阶段前端执行命令, build.devPath为开发阶段前端内容访问路径, build.distDir为构建阶段前端生成的目标文件夹。前端项目使用不同的技术框架时,需要相应修改build健值下的内容。前端内容可以直接通过文件夹来访问时,build.devPath也可以配置成目录,如../src。另外可以添加build.withGlobalTauri:true来将tauri rust 工程中导出的方法作为浏览器window下的全局对象来访问。
tauri.windows下是显示窗口相关的配置,其中title设置标题,width与height设置窗体的宽高。
1 | { |
tauri项目文件源代码
继续查看tauri-app1项目的源代码。src-tauri/src/main.rs文件是rust中的main方法,程序执行的入口,内容如下。greet()函数导出到javascript中,添加了注解#[tauri::command],taurid使用command来实现javascript与rust代码之间的通信,参数会序列化成JSON进行传递。
主函数main()中先创建tauri::Builder,接着调用其invoke_handler()方法设置greet()函数调用,然后调用run()方法开始执行。
1 | // Prevents additional console window on Windows in release, DO NOT REMOVE!! |
再来看下前端界面中如何调用rust中的函数,React项目中的文件为src/App.tsx,如下只列出了重点代码。greet()方法中通过invoke("greet", { name })来调用rust中的方法,在点击button后表单提交时会调用greet()方法,将返回结果设置为greetMsg,然后更新页面显示内容。invoke来自于库@tauri-apps/api/tauri,是个异步方法,一个参数是调用的rust函数名,第二个是以对象方式传递函数的参数。
1 | import { useState } from "react"; |
如果使用原生javascript而不引入库,在配置文件tauri.conf.json中设置参数build.withGlobalTauri:true后,可以通过全局变量来引入:const { invoke } = window.__TAURI__.tauri;。tauri框架也提供了一些桌面应用开发中常用的库,比如文件访问或者网络请求,也是通过这种方式导入到javascript中使用的。
运行项目
在开发时通过使用命令cargo tauri dev来启动应用,查看执行效果。如果有代码更新,工具会自动重新编译,刷新页面内容,还是比较方便的。
1 | cargo install tauri-cli |
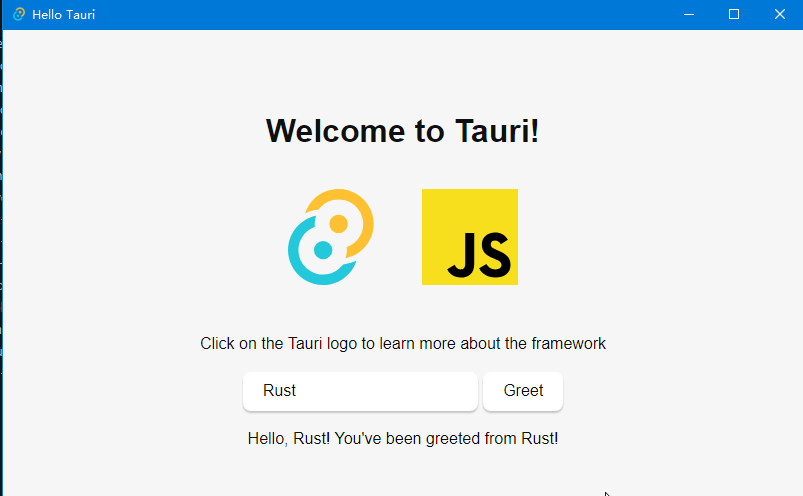
在windows下的显示效果如下,一个输入框,一个显示按钮。

在输入框输入内容,点击Greet按钮,然后下面会多了一行文本显示,即是从rust函数返回的结果。